lazy summary adding in tensorflow

When creating a training script in tensorflow, there rises the need to sometimes add summary protobufs later on in the same step. For example, lets say a training session is in play with a metric calculation step included. Periodically, I want to run a prediction with a validation/test data and record the metrics for these predictions along with the summary writer used to log the process of the training steps. In other words, a tensorboard image like the following is desired:

Also available at medium

Continue reading “lazy summary adding in tensorflow”

first training with YOLOv2

Intro

I have been studying Yolov2 for a while and have first tried using it on car detection in actual road situations. I used tiny-yolo as the base model and used the pre-trained binary weights. While it recognized cars very well with traditional full-shot car images like the ones that a person can see in a commercial, it did not work well in car images that a driver would see in the driver’s seat.

Preparing Dataset

Get Images from Blackbox Video Footage

Clearly, the pretrained model was not trained with driver’s POV car images. In order to gather some data, I took the liberty of copying the blackbox videos from my Dad’s car. It was approximately an hour long. I used the ffprobe tool to extract a screenshot every 3~10seconds of all the videos. There were two cases where I removed the images from my dataset

  • night images. The night images were very dark and the image of the car differed greatly from what the driver would see in daylight. It looked like a good idea to only work with daylight images for now.
  • nearly identical images during halt. When the car is waiting for the signal, it is halted but the blackbox video is still recording. Therefore some extracted screenshots nearly had identical images and it would be redundant to label this data.

In the end I was able to extract 330 images. It is small but let’s see how far we can go with this amount of dataset.

Labeling the Images

This is another separate project that I had been doing. It was about making a tool where I could label the object in an image. First I tried making an Android app which I did roughly complete but it turned out that I was quite irritating to do this job in a small screen. The productivity of labeling was lower than I thought.

I moved on to creating a website to increase labeling efficiency. After 2 weeks of Django programming, I was able to setup a website where I could not only label my images but also manage them in sets.

With this website, I was able to label all 330 images within approx. 1 hour. Of course, this didn’t include time I had to spend fixing bugs with my website while I started labeling.

Converting label data to darkflow compatible json format

After looking in to the xml format that is included in the darkflow source code as an example, the necessary key-values that are required for the darkflow to understand were identified. The box data that accumulated in my webserver then needed to be converted to this compatible format.

Training

Prepare Custom JSON Parser

By default, the darkflow source code can only parse xml format. However, I find json to be much more easy to handle and thus I added a custom JSON Parser to darkflow and tweaked it so that it can read json files instead of xml files.

The training procedure is simple and documented in the README of darkflow source code. Following the guidelines were sufficient to start training

Result

Train Stats

  • total images: 330
  • batch size: 16
  • epoch: 10

Training Progress Graph

Selection_001.png

In total 200 steps were run and the loss became approximately half compared to the beginning.

Test Set Images

I had another set of driver POV video that I took to use as a test set. I picked a few images and ran the three types of predictions. =

  • Pretrained (No additiona training done from me)
  • Step-105 model
  • Step-200 model

Below are the results.

Pretrained (Step-0)

Step-105

Step-200

Conclusion

  • Training with driver’s POV images even with a small dataset does quite improve the car detection from driver’s POV
  • Step-200 seems to be drawing excessive rectangles. Do not know if this is due to immature detection of half-hidden cars. If we did a better job at training half-hidden cars, then perhaps this issue may disappear.
  • The rectangle position and size is still quite off from what I have anticipated. How can I improve this?
    • The rectangle position and size prediction is related with grid size and anchor points inside YOLOv2. Should take a deeper look into this.

darkflow training tips

install Cython.

 $ sudo pip install Cython


when installing darkflow at the beginning, install it through the method that enables code changes to be applied.

pip install -e .

the original source code only contains parser for VOC as an example. However, by taking it as a reference, creating a custom json parser that will interface properly with the existing system is easy.

if you do not pass on the json parsed attributes to the system properly, it may give an wrong result like the following:

Dataset of 4 instance(s)
Training statistics: 
 Learning rate : 1e-05
 Batch size : 4
 Epoch number : 2
 Backup every : 2000
step 1 - loss nan - moving ave loss nan
Finish 1 epoch(es)
step 2 - loss nan - moving ave loss nan
Finish 2 epoch(es)

You can see that the system is not able to calculate the loss properly thus, giving nan instead.

A few mistakes that a user can make is 1) did not properly stringify the string of json values, 2) mixed order in x,y values

['007081.jpg', [500, 375, [['dog', 152, 84, 281, 315], ['person', 32, 84, 223, 351], ['person', 259, 105, 500, 375]]]]

this is a proper sample of dumps that is passed on to the system.

If the user doesn’t str() the json string values, it would give something like this:

[u'testimage1.png', [1920, 1080, [[u'car', 898, 544, 591, 390]]]]

Another case is when the user mistakes the order of x,y values. The order should be (xmin, ymin, xmax, ymax). You can see that the wrong example given above has got the min/max the other way around.

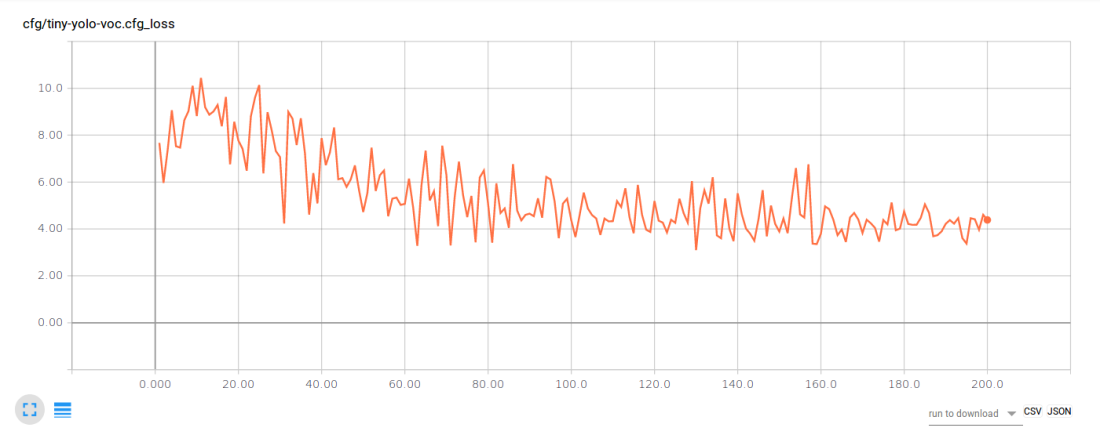
After fixing these minor mistakes, the loss calculation works fine.


“ImportError: libcudnn.so.6: cannot open shared object file: No such file or directory” error

after installing tensorflow package for python3.4 and testing if it imports properly, it failed and gave the following error.

$ python3
Python 3.4.3 (default, Nov 17 2016, 01:08:31) 
[GCC 4.8.4] on linux
Type "help", "copyright", "credits" or "license" for more information.
>>> import tensorflow as tf
Traceback (most recent call last):
 File "/usr/local/lib/python3.4/dist-packages/tensorflow/python/pywrap_tensorflow.py", line 41, in <module>
 from tensorflow.python.pywrap_tensorflow_internal import *
 File "/usr/local/lib/python3.4/dist-packages/tensorflow/python/pywrap_tensorflow_internal.py", line 28, in <module>
 _pywrap_tensorflow_internal = swig_import_helper()
 File "/usr/local/lib/python3.4/dist-packages/tensorflow/python/pywrap_tensorflow_internal.py", line 24, in swig_import_helper
 _mod = imp.load_module('_pywrap_tensorflow_internal', fp, pathname, description)
 File "/usr/lib/python3.4/imp.py", line 243, in load_module
 return load_dynamic(name, filename, file)
ImportError: libcudnn.so.6: cannot open shared object file: No such file or directory

Continue reading ““ImportError: libcudnn.so.6: cannot open shared object file: No such file or directory” error”

tensorflow android detector example study

I am curious on how the YOLO detector would work. Of course, please note that the tensorflow android detector example doesn’t use the YOLO model by default.

It all started in DetectorActivity.java.

// Configuration values for tiny-yolo-voc. Note that the graph is not included with TensorFlow and
// must be manually placed in the assets/ directory by the user.
// Graphs and models downloaded from http://pjreddie.com/darknet/yolo/ may be converted e.g. via
// DarkFlow (https://github.com/thtrieu/darkflow). Sample command:
// ./flow --model cfg/tiny-yolo-voc.cfg --load bin/tiny-yolo-voc.weights --savepb --verbalise
private static final String YOLO_MODEL_FILE = "file:///android_asset/graph-tiny-yolo-voc.pb";
private static final int YOLO_INPUT_SIZE = 416;
private static final String YOLO_INPUT_NAME = "input";
private static final String YOLO_OUTPUT_NAMES = "output";
private static final int YOLO_BLOCK_SIZE = 32;

// Which detection model to use: by default uses Tensorflow Object Detection API frozen
// checkpoints.  Optionally use legacy Multibox (trained using an older version of the API)
// or YOLO.
private enum DetectorMode {
  TF_OD_API, MULTIBOX, YOLO;
}
private static final DetectorMode MODE = DetectorMode.TF_OD_API;

Continue reading “tensorflow android detector example study”

“Loaded runtime CuDNN library: 5005 (compatibility version 5000) but source was compiled with 5110 (compatibility version 5100)” error

I was following the tensorflow image recognition tutorial.

However, when executing the classify_image.py file with the following command,

$ python3 classify_image.py

I got and error:

2017-06-24 02:16:13.306559: W tensorflow/core/framework/op_def_util.cc:332] Op BatchNormWithGlobalNormalization is deprecated. It will cease to work in GraphDef version 9. Use tf.nn.batch_normalization().
2017-06-24 02:16:20.697638: E tensorflow/stream_executor/cuda/cuda_dnn.cc:352] Loaded runtime CuDNN library: 5005 (compatibility version 5000) but source was compiled with 5110 (compatibility version 5100). If using a binary install, upgrade your CuDNN library to match. If building from sources, make sure the library loaded at runtime matches a compatible version specified during compile configuration.
2017-06-24 02:16:20.697957: F tensorflow/core/kernels/conv_ops.cc:671] Check failed: stream->parent()->GetConvolveAlgorithms(&algorithms) 
Aborted (core dumped)


The following part seems to be the error because it has a tag ‘E’ in it.

2017-06-24 02:16:20.697638: E tensorflow/stream_executor/cuda/cuda_dnn.cc:352] Loaded runtime CuDNN library: 5005 (compatibility version 5000) but source was compiled with 5110 (compatibility version 5100). If using a binary install, upgrade your CuDNN library to match. If building from sources, make sure the library loaded at runtime matches a compatible version specified during compile configuration.

By reading it it looked as though it was caused by a version mismatch with the cudnn. Currently, I had the cudnn 5.0 installed. I thought there wasn’t a problem because I ran a simple test and the gpu was recognized with tensorflow. I guess that’s doesn’t prove the full functionality of gpu.

Therefore, I downloaded cudnn5.1, extract the compressed file, copy the contents to the appropriate directories.

After that, I ran the classfiy_image.py again and this time it worked!

Free memory: 3.48GiB
2017-06-24 02:30:44.257604: I tensorflow/core/common_runtime/gpu/gpu_device.cc:961] DMA: 0 
2017-06-24 02:30:44.257609: I tensorflow/core/common_runtime/gpu/gpu_device.cc:971] 0: Y 
2017-06-24 02:30:44.257616: I tensorflow/core/common_runtime/gpu/gpu_device.cc:1030] Creating TensorFlow device (/gpu:0) -> (device: 0, name: GeForce GTX 960M, pci bus id: 0000:02:00.0)
2017-06-24 02:30:44.692819: W tensorflow/core/framework/op_def_util.cc:332] Op BatchNormWithGlobalNormalization is deprecated. It will cease to work in GraphDef version 9. Use tf.nn.batch_normalization().
giant panda, panda, panda bear, coon bear, Ailuropoda melanoleuca (score = 0.89107)
indri, indris, Indri indri, Indri brevicaudatus (score = 0.00779)
lesser panda, red panda, panda, bear cat, cat bear, Ailurus fulgens (score = 0.00296)
custard apple (score = 0.00147)
earthstar (score = 0.00117)


tensorflow gpu version install errors and solutions

when doing the pip/pip3 install, install it with the actual wheel file link. Beware of which python version you are using when trying to locate the right wheel file link in the official tensorflow ubuntu install guide.

At first glance, I thought that the newest versions would automatically have backward compatability so I downloaded `Download cuDNN v6.0 (April 27, 2017), for CUDA 8.0`. However, I found that when importing tensorflow in python it generated an error:

ImportError: libcudnn.so.5: cannot open shared object file: No such file or directory

The ‘so.5’ made me think whether this error was caused due to installing cuDNN v6.0 instead of v5.0. Therefore I downloaded `Download cuDNN v5 (May 27, 2016), for CUDA 8.0` instead. In the end, this solved the problem.

after downloading the library files of cudnn, it seems better to copy and paste it to the /usr/local/cuda directory rather than trying to add a path of the extracted directory to the environment path variable. The commands are like this.(reference from here)

$ sudo cp include/cudnn.h /usr/local/cuda/include
$ sudo cp lib64/* /usr/local/cuda/lib64


after that you probably want to know if tensorflow will work with gpu or not. In order to do this just create a .py file with the code below and run it.\

import tensorflow as tf
# Creates a graph.
a = tf.constant([1.0, 2.0, 3.0, 4.0, 5.0, 6.0], shape=[2, 3], name='a')
b = tf.constant([1.0, 2.0, 3.0, 4.0, 5.0, 6.0], shape=[3, 2], name='b')
c = tf.matmul(a, b)
# Creates a session with log_device_placement set to True.
sess = tf.Session(config=tf.ConfigProto(log_device_placement=True))
# Runs the op.
print(sess.run(c))

I saved this as test.py and ran it with $ python3 test.py. The result will be something like this:

2017-06-19 01:55:57.669377: I tensorflow/core/common_runtime/gpu/gpu_device.cc:1030] Creating TensorFlow device (/gpu:0) -> (device: 0, name: GeForce GTX 850M, pci bus id: 0000:01:00.0)
Device mapping:
/job:localhost/replica:0/task:0/gpu:0 -> device: 0, name: GeForce GTX 850M, pci bus id: 0000:01:00.0
2017-06-19 01:55:57.676832: I tensorflow/core/common_runtime/direct_session.cc:265] Device mapping:
/job:localhost/replica:0/task:0/gpu:0 -> device: 0, name: GeForce GTX 850M, pci bus id: 0000:01:00.0

MatMul: (MatMul): /job:localhost/replica:0/task:0/gpu:0
2017-06-19 01:55:57.678570: I tensorflow/core/common_runtime/simple_placer.cc:847] MatMul: (MatMul)/job:localhost/replica:0/task:0/gpu:0
b: (Const): /job:localhost/replica:0/task:0/gpu:0
2017-06-19 01:55:57.678599: I tensorflow/core/common_runtime/simple_placer.cc:847] b: (Const)/job:localhost/replica:0/task:0/gpu:0
a: (Const): /job:localhost/replica:0/task:0/gpu:0
2017-06-19 01:55:57.678608: I tensorflow/core/common_runtime/simple_placer.cc:847] a: (Const)/job:localhost/replica:0/task:0/gpu:0
[[ 22. 28.]
 [ 49. 64.]]

This is not the entire log but part of the bottom. You can see /gpu:0 along the log and this indicates that the code has been run it the gpu device. If it is run in the cpu it would show /cpu:0 instead.